Purpose
We are revamping the receiving process at the store to assure accuracy and get goods out to the sales floor quicker. This process will only be followed for shipments coming from either Distribution Center for HANGING GOODS and FOOTWEAR ONLY; Accessories will be received using the scan gun and CSV upload process. MPSs will now contain more information, so with this transparency comes trust. This guide will outline updates to MPS, Shipping Labels, and lay out a process to follow to accurately receive product. We will also discuss what to do when things do not match up properly. Here we go!
Tools
- Delivery Schedule
- POS
- MPS
- MPS Clipboard
- Shipping Labels
- Initialed Hang Tag

MPS (an expanded view is featured later)
Process
Print out MPSs from email as you get them and keep on your MPS clipboard. These can also be found in POS in the Receiving Module by clicking MPS and Detail – POS will always have the most up to date information. You will need all MPSs for your upcoming shipments in one place – the MPS Clipboard. As a best practice, check the Allocation screen daily to plan merchandising strategies by going to Receiving->Transfer->Allocations. This is great information to use when considering when to condense a category, when to expand a category, what to use for wall displays, and feature on rounders and 4-ways.
Step 1: Truck Arrives
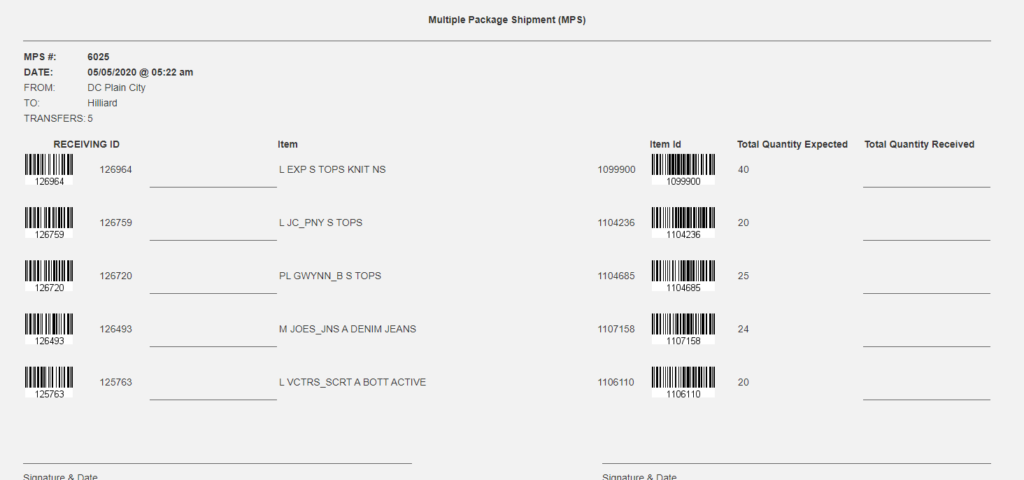
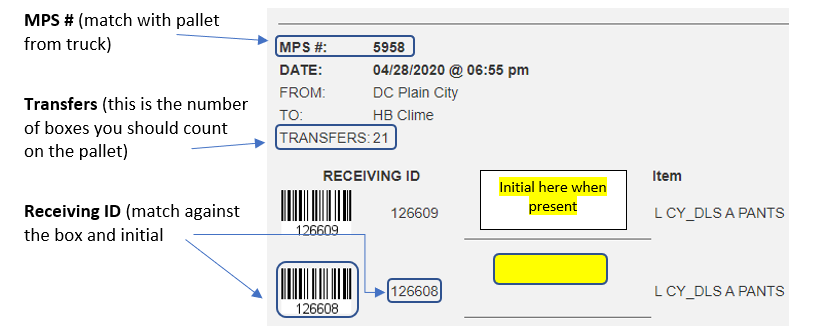
- Match up the MPS number on the pallet to one of the printed MPSs on your clipboard.
- Verify the quantity of transfers/boxes on the MPS is the count of boxes on your pallet
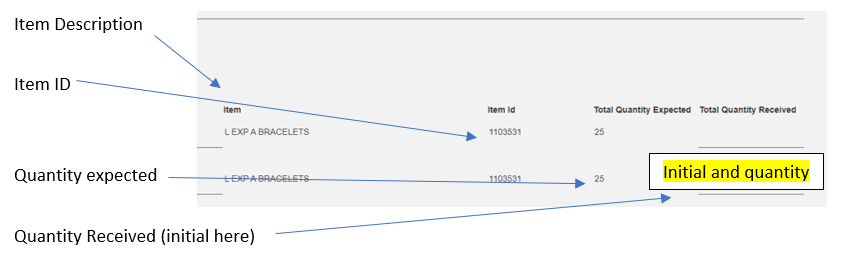
- Verify the RECV ID from the box against the Receiving ID on the MPS and initial the line on the MPS for that RECV ID (see highlights below)
- If all match up, sign and date that MPS and this will be filed away for 2 months at the store.
- IF there is an additional RECV ID not listed on the MPS, write that RECV ID down on the MPS (it may be on a different MPS on the same truck, or could have been added after the MPS was initially emailed)
- IF a RECV ID isn’t initialed off, it could be on a different pallet (MPS Sheet). We’ll address this in the Reconciling MPSs portion.
- Continue to next pallet and MPS until complete with the entire shipment
- Once all MPSs and RECV IDs have been recorded and verified, the team can begin to Process Shipment as outlined below in Step 3 while the person receiving the truck moves on to Reconciling MPSs, Step 2
Step 2: Reconciling MPSs
Now we need to reconcile any of the variances between outstanding RECV IDs and MPSs
- Check the RECV IDs that were handwritten on MPSs against the other MPSs
- If you find that the handwritten RECV ID matches a RECV ID from another MPS, initial that line on the MPS and draw a line through the handwritten RECV ID
- If you still have handwritten RECV IDs on some MPS:
- Check POS – Receiving->MPS->Detail (for the MPS in question)– sometimes transfers are added to the MPS after the initial email is sent
- Print out this new MPS to initial down the page and dispose of the previous MPS with the same number
- Go to POS->Receiving->Transfers->Allocations, you can search the RECV ID, Item ID, MPS # here
- Check POS – Receiving->MPS->Detail (for the MPS in question)– sometimes transfers are added to the MPS after the initial email is sent
- FOR NOW: receive using the CSV upload method – this will be programmed out in future updates.
- Paperclip or staple all MPS from this truck together to file in your receiving drawer for 2 months
- Review POS for outstanding RECV IDs that are older than your previous shipment date – occasionally shipments can leave the DC out of order
- Email help@dfwh.com, Jordan, Joe, Teri, Carolyn for an update listing specific RECV ID #s or MPS #s that have not been received at the store, if you have any
- Discrepancies, such as missing boxes, or extra boxes will be emailed to help@dfwh.com, Jordan, Joe, Teri, Carolyn IF:
- There are missing RECV IDs
- There are extra RECV IDs
Step 3: Processing Shipment
- Staff can open and work one carton at a time, so one person gets one box to follow the next 4 bullet points. Please note: this part is a TEAM effort, and does not fall to only one person.
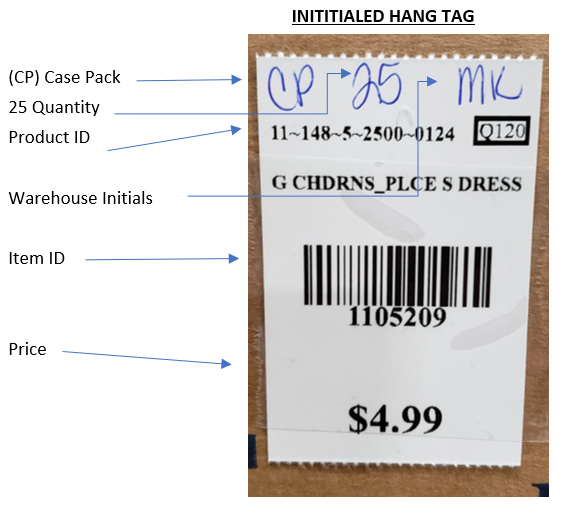
- Verify the SKU on the product is the same as the Receiving label on the box and the Initialed Hang Tag on the box
- While hanging goods, count items to verify that the quantity matches the Initialed Hang Tag and Shipping Label quantities
- All good? Initial on the MPS and move on to the next box!
- Quantities or SKUs don’t match the box? Report to store leadership immediately with the box!
- Store leadership will email variance to help@dfwh.com, Jordan, Joe, Teri, Carolyn
- One email can be sent per MPS issue
- Email needs to contain RCV ID on the box, SKU and Qty INSIDE the box, and an image of the Initialed Hang Tag.
- Inventory team will make the needed changes to the system
- In future MPS Receiving updates, you will be able to make these changes in POS on the MPS